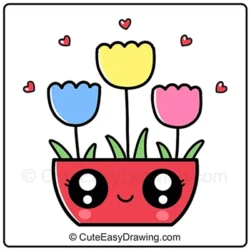
How to draw a cute flower pot with 3 tulips is a simple and enjoyable art activity for kids. This step-by-step tutorial helps children follow clear drawing steps to create a cute tulip flower pot that works well for spring themes, birthdays, or everyday creative practice. It supports imagination, focus, and fine motor skills while keeping the drawing process fun and colorful 🎨🌷
This guide is suitable for parents, teachers, and caregivers looking for an easy and engaging drawing activity for children.
Why Learn to Draw a Flower Pot with Tulips? 🌷🌷🌷
Flowers often represent brightness and positivity, and tulips are simple to draw while still looking attractive. This drawing activity helps children:
- Practice basic shapes and smooth lines
- Improve hand-eye coordination
- Develop focus and patience during drawing
- Explore creativity through colors and simple details
- Create artwork suitable for spring themes or Mother’s Day projects
The added cartoon eyes and smile give the flower pot a friendly look, making the drawing more engaging and enjoyable to repeat.
What You’ll Need:
✔ Pencil ✏
✔ Eraser 🧽
✔ Black marker for outlining 🖊
✔ Colored pencils or markers 🎨
Let’s Get Started! Your Easy Guide to Drawing a Cute Flower Pot with Tulips
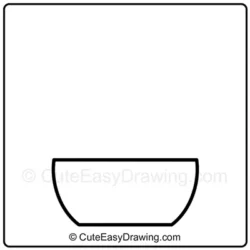
Step 1: Draw the Flower Pot
Start by drawing the base of the flower pot. Draw a flat line at the top and bottom, then curve the sides to connect them — forming a cute rounded shape that will hold your tulips.
💡 This simple pot will soon be blooming with charm!🌸🪴✍️
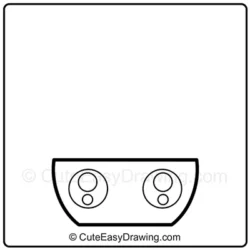
Step 2: Add Big Cartoon Eyes
Inside the pot, draw two big cartoon eyes. Begin with two large circles spaced apart. Inside each, add two smaller circles to make them look shiny and expressive.
💡 These eyes will bring your flower pot to life with personality!
😍🫧🖌️
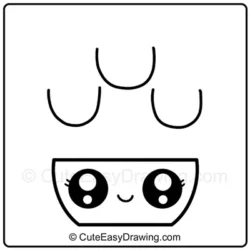
Step 3: Fill in Details & Sketch Tulip Bases
Shade in the big part of the eyes, keeping the smaller circles white for sparkle. Add a small smiling mouth between the eyes, and don’t forget tiny dashes for eyelashes!
Then, above the pot, sketch three evenly spaced “U” shapes — these are the base of your tulip flowers.
💡 You’re building the happy face and the starting point of your tulips!
😊🌷✨
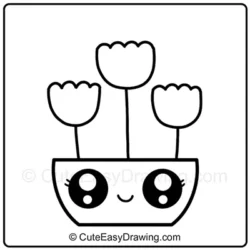
Step 4: Draw the Tulip Petals & Stems
Top each “U” shape with zig-zag or scalloped lines to create tulip petals. Then, draw a straight vertical line from each flower down into the pot — these are the stems!
💡 Now your flowers are growing tall and proud!
🌼🪻🌿
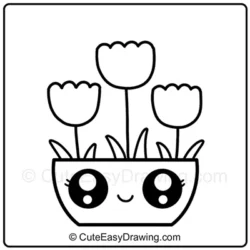
Step 5: Add the Leaves
Add two curved leaves at the base of each tulip. Let them point outward to give the plant a nice, full look. Your flower pot is starting to look adorable!
💡 The leaves make it feel lush and complete!
🍃💚🌱

Step 6: Splash with Color & Add Sweet Details! 🎨💖
Now the fun part — coloring! Paint the tulips in bright shades like yellow, blue, and pink. Color the pot a fun red or pastel tone. Bring it all to life by adding hearts, sparkles, or anything magical around it!
💡 A splash of color makes your drawing truly bloom!
🎨❤️💖🌟
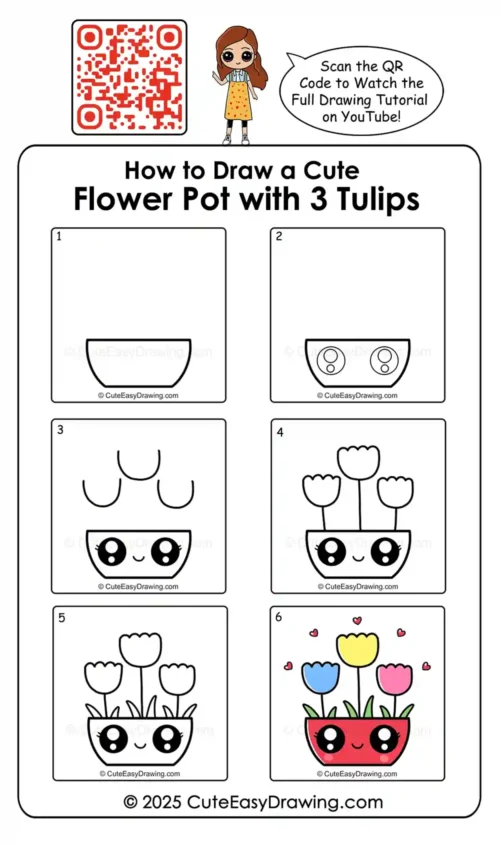
The Complete Drawing Steps: Flower Pot with Tulips
Rate this tutorial from 1 to 10
Watch the Step-by-Step Video Tutorial! 🎥
📌 Or scan the QR code in the image above to watch the full tutorial on YouTube! 🎨
Drawing Tips for Parents and Kids
- Use light pencil strokes first, so it’s easy to correct small mistakes before outlining.
- Make it playful — Let your child pick the tulip colors and decorate the pot however they like.
- Add a story — Give the flower pot a name and a fun personality!
- Encourage progress over perfection — Even wobbly lines are beautiful when a child creates them with joy.
Final Thoughts
By following this tutorial, children learn how to draw a cute flower pot with 3 tulips while improving basic drawing skills and creative confidence. The finished drawing can be used for cards, small gifts, or simple artwork to display at home, making the activity both enjoyable and rewarding 💐
Don’t forget to share your drawings with us on Instagram 👉 @cuteeasy.drawings
FAQs – Parents Might Ask
Q1. What age is this drawing tutorial suitable for?
A: This tutorial is great for ages 4 to 10, with some parent help for younger kids.
Q2. What supplies do we need?
A: Just paper, a pencil, an eraser, and crayons or colored pencils. Optional: a black pen or marker for outlining.
Q3. Can this drawing be used for school projects or greeting cards?
A: Absolutely! This tulip flower pot is perfect for springtime art, Mother’s Day cards, or homemade gifts.
Q4. How long does it take to complete?
A: Around 10–20 minutes, depending on how much time your child spends coloring and decorating.
Q5. Can I print this tutorial?
A: Yes! Just hit print or screenshot the step-by-step section and enjoy offline drawing anytime.
For more creative fun, check out our drawing videos at CuteEasyDrawings!
💖 Love cute drawings? Check out our free coloring pages and art tutorials!
👉 Get free coloring pages
👉 Shop our cute coloring books
👉 Follow us for more cute drawings!
📷 Instagram: @cuteeasy.drawings
📺 YouTube: @CuteEasyDrawings

Free Coloring Pages for Your Inbox!
We’ll never spam you — just fun stuff for you and your little artist. Pinky promise.😊

